This tutorial will show you how to make a round, bucket-shaped pouch for your small critters. This pouch is a favorite with sugar glider owners in particular as it can hold several gliders comfortably, and the open design qualifies it as an “open environment” pouch. This allows your gliders to see you better as you reach in and check on them, which eases the stress response for many nocturnal pets.
You will need:
- 2 equal sized rectangular strips of fleece (one outer color and one inner color if you desire)
- 2 equal sized round pieces of fleece for the bottoms (one outer and one inner color)
- fleece strips for hanging if you wish to hang your pouch.
The formula for sizing the your pouch is as follows: Find the diameter of your bottom using C=πd. C is the circumference of your circle, which is determined by the length of your rectangular piece. This will vary according to individual preference. For this tutorial, a rectangle 22″ in length was used. To find the diameter of the circle, divide your rectangle length (or C) by π (π≅3.14). For this pouch, 22/π= approximately 7. so I made a circle with the diameter of 7″. The height of your rectangle will be the height of the sides of your pouch. For this pouch, I measured a rectangle of 22″ by 7″. You may use different dimensions to make the pouch shorter or taller.
 Start with 2 equal rectangles of fleece (shown are 7″ x 22″), 2 equal circles of fleece (shown are 7″ diameter circles), and fleece strips for hanging (here I used 3 strips, you could also use 4).
 Fold the inner piece of fleece in half longways, with right sides together.
 Stitch along the open short side, leaving a 1/2″ seam allowance. Backstitch at both ends. This will create a shallow “tube”
 Pin your inner circle around the open end of the tube you’ve just created, right sides facing in.
 Sew carefully around the edge of the circle, making sure to match the rounded edge to the straight edge of the tube.
 Now one end of your tube will be covered.
 Carefully clip notches into your seam allowance, making sure not to clip into the stitching. Clip all the way around the circular bottom, about 1/2″ to 3/4″ apart.
 Repeat these steps with your outer fleece.
 Reverse the inner piece so that it appears right side out.
 Nest the inner layer inside the outer layer. You should be able to see the raw seams of both pieces.
 If you will be adding strips for hanging, you will pin them in now. Fold each strip in half, and place in between the two layers, loop side down.
 Pin in place with the raw edges matching.
 Sew around the top edge of the pouch, leaving about 1.5″ open to turn the pouch. Backstitch on either side of the opening.
 Turn the pouch right side out.
 Tuck your inner layer into the outer layer. Tuck the raw edges of your turning hole under and prepare it for topstitching.
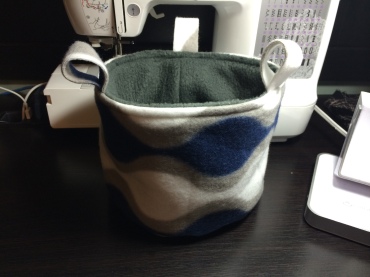
 To finish, you may topstitch just the turning hole, or around the entire top of the pouch. Make sure your topstitch is neat, tight, and is a small stitch length. Trim all excess thread showing, and you’re done!